User login and consent flow
This guide will walk you through the process of customizing Ory OAuth2 and OpenID Connect to work with your user database, login UI, and consent logic and UI. We'll cover everything you need to know, including how to redirect users to your login endpoint, how to fetch and process login and consent requests, and how to use the SDK to accept or reject these requests.
By default, Ory OAuth2 and OpenID Connect is integrated with Ory Identities and the Ory Account Experience. Read this document if you want to customize the user backend, login UI, or consent logic and UI.
How Ory OAuth2 and OpenID Connect works
OAuth2 and OpenID Connect requires an authenticated end user session for all OAuth2 / OpenID Connect flows except the client Credentials flow which doesn't involve end users. Ory OAuth2 and OpenID Connect doesn't contain a database with end users but instead uses HTTP redirection to "delegate" the login flow to another app - this is the "Ory OAuth 2.0 login & consent flow".
Example implementation
You can find an example Node.js implementation of an app that implements custom login and consent on Ory's GitHub.
Login
The OAuth2 2.0 / OpenID Connect Flow is initiated by pointing the end user's browser to the /oauth2/auth endpoint. Depending on
the OAuth2 flow you want to use, some of the query parameters (for example /oauth2/auth?response_type=code or
/oauth2/auth?response_type=token) can change. Starting flows always involves sending the browser to that URL.
The next task for Ory OAuth2 and OpenID Connect is to know the user of the request. To achieve that, Ory OAuth2 and OpenID Connect
checks if a session cookie is set containing information about a previously successful login. Additionally, OpenID Connect
parameters id_token_hint, prompt, and max_age are evaluated and processed. Depending on their values and the login state,
the user might need to re-authenticate or the flow will fail.
To authenticate the user (this happens regardless of whether a session exists for the user or not), Ory OAuth2 and OpenID Connect redirects the browser to the "login endpoint" established in your config:
ory patch oauth2-config
  --replace "/urls/login=\"https://login.example.org/oauth2-login\""
Ory OAuth2 and OpenID Connect appends a login_challenge query parameter to the URL. The value is an ID which should later be
used by the login endpoint to fetch important information about the request.
https://login.example.org/oauth2-login?login_challenge=7bb518c4
The way you authenticate the end user is up to you. In most cases, you will show an HTML form similar to:
<form action="/login" method="post">
  <input type="hidden" name="csrf_token" value="...." />
  <!-- Use CSRF tokens in your HTML forms! -->
  <input type="email" name="login_email" placeholder="Please enter your email address to log in" />
  <input type="password" name="login_password" />
  <input type="checkbox" name="remember" value="Remember me on this device" />
  <input type="submit" value="Log in" />
</form>
Login endpoint code example
The Login Endpoint (set by configuration key /urls/login) is an application written by you. It uses the login_challenge value
in the URL to complete the login flow using the Ory SDK:
import { Configuration, OAuth2Api } from "@ory/client"
import { Request, Response } from "express"

const ory = new OAuth2Api(
  new Configuration({
    basePath: `https://${process.env.ORY_PROJECT_SLUG}.projects.oryapis.com`,
    accessToken: process.env.ORY_API_KEY,
  }),
)

function authenticateUserCredentials(email: string, password: string): any {
  // Example method to authenticate users and fetch them from the DB.
}

// Please note that this is an example implementation.
// In a production app, please add proper error handling.
export async function handleLogin(request: Request, response: Response) {
  const challenge = request.query.login_challenge.toString()
  const { data: loginRequest } = await ory.getOAuth2LoginRequest({
    loginChallenge: challenge.toString(),
  })

  if (loginRequest.skip) {
    // User is already authenticated, don't show the login form and simply accept the login request.
    await ory
      .acceptOAuth2LoginRequest({
        loginChallenge: challenge,
        acceptOAuth2LoginRequest: {
          subject: loginRequest.subject,
        },
      })
      .then(({ data }) => response.redirect(data.redirect_to))
    return
  }

  // Show the login form if the form was not submitted.
  if (request.method === "GET") {
    response.render("login", {
      loginRequest,
    })
    return
  }

  // The user did not want to sign in with the given app.
  if (request.body.submit === "Deny access") {
    await ory
      .rejectOAuth2LoginRequest({
        loginChallenge: challenge,
        rejectOAuth2Request: {
          error: "access_denied",
          error_description: "The resource owner denied the request",
        },
      })
      .then(({ data }) => response.redirect(data.redirect_to))
  }

  const user = authenticateUserCredentials(
    request.body.email,
    request.body.password,
  )

  // Check login credentials (e.g. email + password) in your user database.
  if (user!) {
    response.render("login", { error: "invalid credentials", loginRequest })
    return
  }

  // User was authenticated successfully,
  return await ory
    .acceptOAuth2LoginRequest({
      loginChallenge: challenge,
      acceptOAuth2LoginRequest: {
        subject: user.id,
        remember: Boolean(request.body.remember),
        remember_for: 3600,
        context: {
          // You can add any context that you want to be available to the consent endpoint.
        },
      },
    })
    .then(({ data }) => response.redirect(data.redirect_to))
}
The response contains information about the login request. The body contains a skip value. If the value is false, the user interface must be shown. If skip is true, you shouldn't show the user interface but instead just accept or reject the login request.
Once the end user authenticated successfully, you either accept the login challenge, or you reject (for example the user isn't allowed to perform OAuth2 flows) the login challenge.
Consent
Once the login challenge is accepted, Ory OAuth2 and OpenID Connect will ask the user for consent:
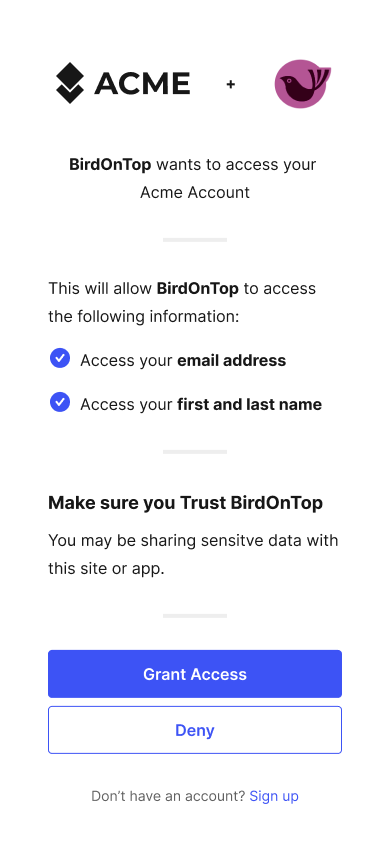
The logic and UI is fully under your control, because Ory OAuth2 and OpenID Connect redirects the end user's browser to the "Consent Endpoint" established in your config:
ory patch oauth2-config
  --replace "/urls/consent=\"https://consent.example.org/oauth2-consent\""
Ory OAuth2 and OpenID Connect appends a consent_challenge query parameter to the URL. The value is an ID which should later be used by the Consent Endpoint to fetch important information about the request.
https://consent.example.org/oauth2-consent?consent_challenge=7bb518c4eec2454dbb289f5fdb4c0ee2
The way you collect the consent information from the end user is up to you. In most cases, you will show an HTML form similar to:
<form action="/consent" method="post">
  <input type="hidden" name="csrf_token" value="...." />
  <!-- Use CSRF tokens in your HTML forms! -->
  <input type="checkbox" name="scope" value="email" />
  <input type="checkbox" name="scope" value="profile" />
  <input type="submit" name="submit" value="accept" />
  <input type="submit" name="submit" value="reject" />
</form>
Skipping consent for trusted clients
When you create an OAuth2 client in your Ory Network project, you can configure it to skip the "consent screen", which is the screen where the user must explicitly agree to giving the client access to their data and allow perform operations on their behalf.
This approach is useful when you're working with trusted, first-party clients managed by the same entity that manages the Ory Network project.
You can turn on skipping the consent screen on a per-client basis through the Ory Console. Follow these steps to enable consent screen skipping for existing OAuth2 clients:
- Go to OAuth 2 → OAuth2 Clients in the Ory Console.
- Find the client for which you want to turn on consent skipping and click the [pencil icon] in the Actions column.
- Use the Skip consent toggle in the Consent screen section to manage the feature. When you turn this feature on, consent skipping is enabled for the client.
- Scroll back to the top and click Save.
You can enable consent skipping when you create new OAuth2 clients. Use the Skip consent toggle in the Consent screen section to manage the feature.
Implementation
Skipping the consent screen is managed by the challenge object returned from
getOAuth2ConsentRequest.
If the consent is skipped for the given OAuth2 client, challenge.client.skip_consent is true.
For TypeScript, the following snippet shows how to determine whether to skip the consent screen UI:
const { consent_challenge } = req.query // the HTTP request

const challenge = await oauth2
  .getOAuth2ConsentRequest({ consentChallenge: String(consent_challenge) })
  .then(({ data: body }) => body)

const skipConsent =
  challenge.skip || // skip because the user accepted the consent previously
  challenge.client.skip_consent // skip because the client is trusted

if (skipConsent) {
  // If the consent is skipped, we accept the consent request immediately.
  await oauth2.acceptOAuth2ConsentRequest({
    consentChallenge: String(consent_challenge),
    acceptOAuth2ConsentRequest: {
      grant_scope: challenge.requested_scope,
      grant_access_token_audience: challenge.requested_access_token_audience,
      session,
    },
  })
}

// Next, add code that shows the consent screen.
// This is used when the client doesn't have consent skipping enabled.
// Check out an example consent screen implementation in an app here:
// https://github.com/ory/hydra-login-consent-node/blob/f6ab9d1156aeabbd941f9920ff85408ca0a1f2d4/src/routes/consent.ts#L41
Previous consent
A consent has five distinctive attributes:
- The requested scope (
scope=email+profile+offline_access) - The OAuth2 client (
client_id=abcd) - The end user (this is the subject set in the Login Flow)
- If a previous consent exists, the previous consent has
remember: true, and the scope granted by the user (did the user accept all ofemail,profile,offline_access). - Whether or not the OAuth2 client is set to always skip consent.
There are three possible states:
- The user has never before authorized ("consent") the OAuth2 client before.
- The user has authorized ("consent") the OAuth2 client before and chose to remember the "consent".
- The user has authorized ("consent") the OAuth2 client before, and chose to remember the "consent", but the OAuth2 client now
also wants additional permissions ("has changed the token scope" in
/oauth2/auth?scope=...).
Regardless of which of these three states we're in, the end user's browser is always redirected to the Consent Endpoint. What changes is the skip value, as explained a bit later.
In certain scenarios (for example a special OAuth2 client), you might not want to show the consent screen at all. In those cases, you can choose to skip showing the UI and just accept the consent. Please keep in mind that OAuth2 is a delegation protocol and that it makes most sense for third-party access. Not showing the consent screen will break OpenID Connect Certification.
Consent endpoint code example
The Consent Endpoint uses the consent_challenge value in the URL to complete the consent using the Ory SDK:
import {
  AcceptOAuth2ConsentRequestSession,
  IdentityApi,
  OAuth2ConsentRequest,
} from "@ory/client"
import { UserConsentCard } from "@ory/elements-markup"
import bodyParser from "body-parser"
import csrf from "csurf"
import { defaultConfig, RouteCreator, RouteRegistrator } from "../pkg"
import { register404Route } from "./404"
import { oidcConformityMaybeFakeSession } from "./stub/oidc-cert"

async function createOAuth2ConsentRequestSession(
  grantScopes: string[],
  consentRequest: OAuth2ConsentRequest,
  identityApi: IdentityApi,
): Promise<AcceptOAuth2ConsentRequestSession> {
  // The session allows us to set session data for id and access tokens

  const id_token: { [key: string]: any } = {}

  if (consentRequest.subject && grantScopes.length > 0) {
    const identity = (
      await identityApi.getIdentity({ id: consentRequest.subject })
    ).data

    if (grantScopes.indexOf("email") > -1) {
      // Client may check email of user
      id_token.email = identity.traits["email"] || ""
    }
    if (grantScopes.indexOf("phone") > -1) {
      // Client may check phone number of user
      id_token.phone = identity.traits["phone"] || ""
    }
  }

  return {
    // This data will be available when introspecting the token. Try to avoid sensitive information here,
    // unless you limit who can introspect tokens.
    access_token: {
      // foo: 'bar'
    },

    // This data will be available in the ID token.
    id_token,
  }
}

// A simple express handler that shows the Hydra consent screen.
export const createConsentRoute: RouteCreator =
  (createHelpers) => (req, res, next) => {
    console.log("createConsentRoute")
    res.locals.projectName = "An application requests access to your data!"

    const { oauth2, identity } = createHelpers(req, res)
    const { consent_challenge } = req.query

    // The challenge is used to fetch information about the consent request from ORY hydraAdmin.
    const challenge = String(consent_challenge)
    if (!challenge) {
      next(
        new Error("Expected a consent challenge to be set but received none."),
      )
      return
    }

    let trustedClients: string[] = []
    if (process.env.TRUSTED_CLIENT_IDS) {
      trustedClients = String(process.env.TRUSTED_CLIENT_IDS).split(",")
    }

    console.log("getOAuth2ConsentRequest", challenge)
    // This section processes consent requests and either shows the consent UI or
    // accepts the consent request right away if the user has given consent to this
    // app before
    oauth2
      .getOAuth2ConsentRequest({ consentChallenge: challenge })
      // This will be called if the HTTP request was successful
      .then(async ({ data: body }) => {
        // If a user has granted this application the requested scope, hydra will tell us to not show the UI.
        if (
          body.skip ||
          body.client?.skip_consent ||
          (body.client?.client_id &&
            trustedClients.indexOf(body.client?.client_id) > -1)
        ) {
          // You can apply logic here, for example grant another scope, or do whatever...
          // ...

          let grantScope: string[] = body.requested_scope || []
          if (!Array.isArray(grantScope)) {
            grantScope = [grantScope]
          }
          const session = await createOAuth2ConsentRequestSession(
            grantScope,
            body,
            identity,
          )

          // Now it's time to grant the consent request. You could also deny the request if something went terribly wrong
          return oauth2
            .acceptOAuth2ConsentRequest({
              consentChallenge: challenge,
              acceptOAuth2ConsentRequest: {
                // We can grant all scopes that have been requested - hydra already checked for us that no additional scopes
                // are requested accidentally.
                grant_scope: grantScope,

                // ORY Hydra checks if requested audiences are allowed by the client, so we can simply echo this.
                grant_access_token_audience:
                  body.requested_access_token_audience,

                // The session allows us to set session data for id and access tokens
                session,
              },
            })
            .then(({ data: body }) => {
              // All we need to do now is to redirect the user back to hydra!
              res.redirect(String(body.redirect_to))
            })
        }

        // If consent can't be skipped we MUST show the consent UI.
        res.render("consent", {
          card: UserConsentCard({
            consent: body,
            csrfToken: req.csrfToken(),
            cardImage: body.client?.logo_uri || "/ory-logo.svg",
            client_name: body.client?.client_name || "unknown client",
            requested_scope: body.requested_scope,
            client: body.client,
            action: (process.env.BASE_URL || "") + "/consent",
          }),
        })
      })
      // This will handle any error that happens when making HTTP calls to hydra
      .catch(next)
    // The consent request has now either been accepted automatically or rendered.
  }

export const createConsentPostRoute: RouteCreator =
  (createHelpers) => (req, res, next) => {
    // The challenge is a hidden input field, so we have to retrieve it from the request body
    const challenge = req.body.consent_challenge
    const { oauth2, identity } = createHelpers(req, res)

    // Let's see if the user decided to accept or reject the consent request..
    if (req.body.submit === "Deny access") {
      // Looks like the consent request was denied by the user
      return (
        oauth2
          .rejectOAuth2ConsentRequest({
            consentChallenge: challenge,
            rejectOAuth2Request: {
              error: "access_denied",
              error_description: "The resource owner denied the request",
            },
          })
          .then(({ data: body }) => {
            // All we need to do now is to redirect the browser back to hydra!
            res.redirect(String(body.redirect_to))
          })
          // This will handle any error that happens when making HTTP calls to hydra
          .catch(next)
      )
    }

    let grantScope = req.body.grant_scope
    if (!Array.isArray(grantScope)) {
      grantScope = [grantScope]
    }

    // Here is also the place to add data to the ID or access token. For example,
    // if the scope 'profile' is added, add the family and given name to the ID Token claims:
    // if (grantScope.indexOf('profile')) {
    //   session.id_token.family_name = 'Doe'
    //   session.id_token.given_name = 'John'
    // }

    // Let's fetch the consent request again to be able to set `grantAccessTokenAudience` properly.
    oauth2
      .getOAuth2ConsentRequest({ consentChallenge: challenge })
      // This will be called if the HTTP request was successful
      .then(async ({ data: body }) => {
        const session = await createOAuth2ConsentRequestSession(
          grantScope,
          body,
          identity,
        )
        return oauth2
          .acceptOAuth2ConsentRequest({
            consentChallenge: challenge,
            acceptOAuth2ConsentRequest: {
              // We can grant all scopes that have been requested - hydra already checked for us that no additional scopes
              // are requested accidentally.
              grant_scope: grantScope,

              // If the environment variable CONFORMITY_FAKE_CLAIMS is set we are assuming that
              // the app is built for the automated OpenID Connect Conformity Test Suite. You
              // can peak inside the code for some ideas, but be aware that all data is fake
              // and this only exists to fake a login system which works in accordance to OpenID Connect.
              //
              // If that variable is not set, the session will be used as-is.
              session: oidcConformityMaybeFakeSession(
                grantScope,
                body,
                session,
              ),

              // ORY Hydra checks if requested audiences are allowed by the client, so we can simply echo this.
              grant_access_token_audience: body.requested_access_token_audience,

              // This tells hydra to remember this consent request and allow the same client to request the same
              // scopes from the same user, without showing the UI, in the future.
              remember: Boolean(req.body.remember),

              // When this "remember" sesion expires, in seconds. Set this to 0 so it will never expire.
              remember_for: process.env.REMEMBER_CONSENT_FOR_SECONDS
                ? Number(process.env.REMEMBER_CONSENT_SESSION_FOR_SECONDS)
                : 3600,
            },
          })
          .then(({ data: body }) => {
            // All we need to do now is to redirect the user back!
            res.redirect(String(body.redirect_to))
          })
      })
      .catch(next)
  }

// Sets up csrf protection
const csrfProtection = csrf({
  cookie: {
    sameSite: "lax",
  },
})

var parseForm = bodyParser.urlencoded({ extended: false })

export const registerConsentRoute: RouteRegistrator = function (
  app,
  createHelpers = defaultConfig,
) {
  if (process.env.HYDRA_ADMIN_URL) {
    console.log("found HYDRA_ADMIN_URL")
    return app.get(
      "/consent",
      csrfProtection,
      createConsentRoute(createHelpers),
    )
  } else {
    return register404Route
  }
}

export const registerConsentPostRoute: RouteRegistrator = function (
  app,
  createHelpers = defaultConfig,
) {
  if (process.env.HYDRA_ADMIN_URL) {
    return app.post(
      "/consent",
      parseForm,
      csrfProtection,
      createConsentPostRoute(createHelpers),
    )
  } else {
    return register404Route
  }
}
The response contains information about the consent request. The body contains a skip value. If the value is false, the user
interface must be shown. If skip is true, you shouldn't show the user interface but instead just accept or reject the consent
request.
Flow steps
- The OAuth 2.0 Client initiates an Authorize Code, Hybrid, or Implicit flow. The user's user agent is redirect to
https://{project-slug}.projects.oryapis.com/oauth2/auth?client_id=...&.... - Ory OAuth2, if unable to authenticate the user (= no session cookie exists), redirects the user's user agent to the Login
Provider URL. The application "sitting" at that URL is implemented by you and typically shows a login user interface ("Please
enter your username and password"). The URL the user is redirect to looks like
https://example.org/oauth2-screens/login?login_challenge=1234.... - The Login Provider, once the user has logged in, tells Ory OAuth2 some information about who the user is (for example the
user's ID) and also that the login attempt was successful. This is done using a REST request which includes another redirect
URL like
https://{project-slug}.projects.oryapis.com/oauth2/auth?client_id=...&...&login_verifier=4321. - The user's user agent follows the redirect and lands back at Ory OAuth2. Next, Ory OAuth2 redirects the user's user agent to
the Consent Provider, hosted at - for example -
https://example.org/oauth2-screens/consent?consent_challenge=4567... - The Consent Provider shows a user interface which asks the user if they would like to grant the OAuth 2.0 Client the requested permissions ("OAuth 2.0 Scope"). You've probably seen this screen around, which is something like: "Would you like to grant Facebook Image Backup access to all your private and public images?".
- The Consent Provider makes another REST request to Ory OAuth2 to let it know which permissions the user authorized, and if the
user authorized the request at all. The user can choose to not grant an application any access to his/her personal data. In the
response of that REST request, a redirect URL is included like
https://{project-slug}.projects.oryapis.com/oauth2/auth?client_id=...&...&consent_verifier=7654.... - The user's user agent follows that redirect.
- Now, the user has authenticated and authorized the application. Next, Ory OAuth2 will run checks and if everything works out, issue access, refresh, and ID tokens.
This flow allows you to take full control of the behavior of your login system, authentication methods, and consent screen. A well-documented reference implementation for both the Login and Consent Provider is available on GitHub.